Monday, 19 February 2018

Scrapstore

Kerry had told us about the Scrapstore which is this magical place full of mostly scraps of rubbish essentially. There was so much cool stuff that I couldn't help but keep taking things that I didn't even have a use for yet. But you never know when it might come in handy.
The Scrapstore may be especially handy for the animation project coming up as we will be trying to save on materials where we can! Plus I think being resourceful when making a stop-motion can give it more character.

Things they have that may be useful:

  • Fabrics
  • Acrylic
  • Card & Paper
  • Plastic bottle caps
  • Buttons, needles, wool
  • Paint

Thursday, 15 February 2018

Animation Project: Moodboards

Initial forest set moodboard.

Desert set moodboard.


Death character moodboard.

Thursday, 8 February 2018

Making my sign

I started out by making prototype apertures from a website that made a cardboard one. These seemed to work quite well. But I still looked up other ways of making them so that I had the easiest design to replicate.


After this first attempt I decided my aperture needed more blades so that it wouldn't have gaps when it closed. I also altered the design so that it had a front and back cover to hold it all in place and a handle part to work the mechanism.

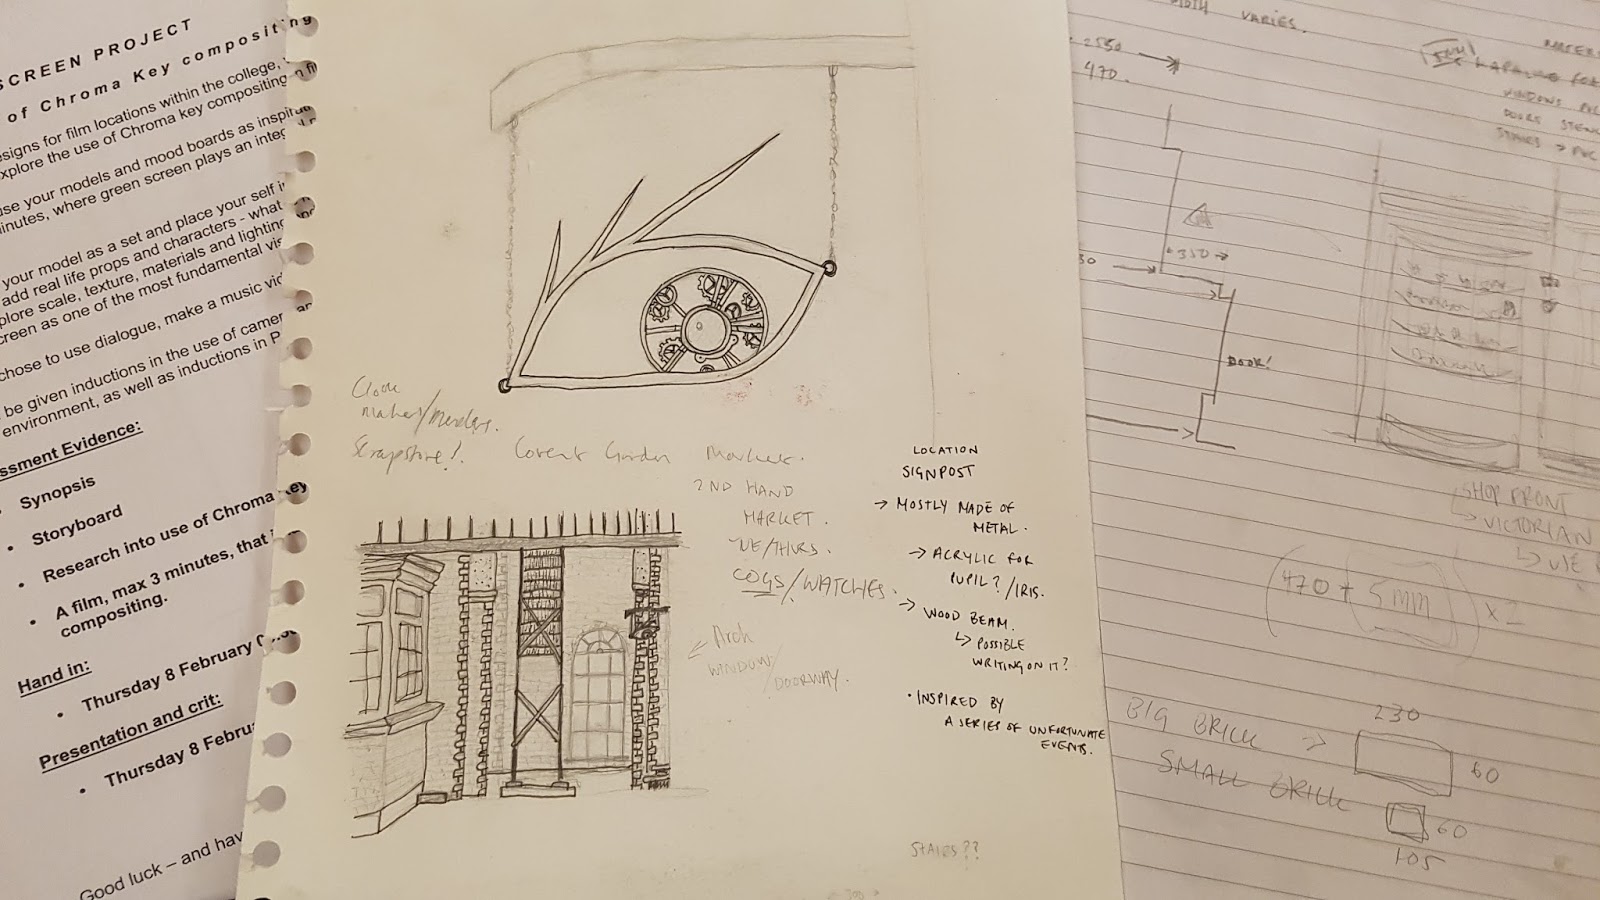
The next step was figuring out the best material to make it out of. I knew I wanted the eye to be a metal frame with the aperture as the iris as the would fit better with the steampunk theme I had in my colour model.

~ Making the rings in metalwork ~
I went to woodwork first and asked what they thought was best and they suggested I go to the metal workshop and wood may break with the holes being so close to the edge. So after talking with Tyson he suggested I try cut out the circular pieces and see how it goes from there.


I brought my prototype to use as a template which made it a lot easier. I did struggle to cut out the metal using the big metal cutter as I wasn't really strong enough to use it. In the end Tyson taught me how to use the plasma cutter. This was so much faster and its such an easy piece of machinery to use! I'm so glad I learnt how to use it as it may come in handy in the future. I did then have a lot of sanding down to do as the plasma cutter leaves a very rough edge. At this point I had realised that this process was very slow and that I may be better off using the laser cutter and making the aperture rings out of acrylic. I could then make these look like metal with the right painting techniques.

~ Making the rings on the laser cutter ~
The next step was to draw up my design on illustrator so that I could cut it on the laser cutter. This didn't take me long at all as I have a lot of experience from my foundation course laser cutting large complex pieces.

I learnt how to use the laser cutter in the maker space and cut out the ring pieces. I did face some problems with the sizing of the pieces. When I cut them out the were a few cm smaller in diameter than the original design. I had to recut one piece as it was now larger than the other pieces but I was able to do this with few issues.

~ Making the metal frame eye ~
I managed to get this done quite quickly with the help of Tyson. I used the metal roller to get all the pieces curved to the right amount and then it was ready to all be welded together. My welding is still not the neatest but I think I have a better understanding of how it works.


~ Making the blades ~
This was probable the hardest part of my sign that needed figuring out. I had to use a thin and smooth material so that the blades would smoothly run over the top of each other. From the ones I'd seen people had made online they'd used thin wood or metal sheet. I went to woodwork to see if they had any material that would be appropriate and they didn't have anything in that would be suitable. I also thought about using tough card and laser cutting them but then they may not move very well.
After discussing this issue with class mates I decided to use Styrene sheet as I would be able to spraymount a printout of the blades onto it as a template. I went to metalwork and cut the excess Styrene away. Then I used scissors to cut closely around the blades and punched the holes out with a metal hole punch. I then filed all the blades down so they'd move smoothly. I glued on Styrene round tube for the rivets.

~ Sign assembling ~
I bought 2m metal chain from the DIY store in Tooting so that my sign can be hung up later. I glued the aperture piece to my sign with epoxy adhesive, after some researching this was my best option for gluing together metal and acrylic plastic.


This is what my final sign looks like. I faced a lot of problems along the way and it took a lot of calculating and brain work but I think I'm quite proud of how its turns out. The aperture works to an extent but if I made it again I would make the blades wider so they wouldn't fall underneath when closed too far. Overall I really enjoyed learning all the different processes in the different workshop.

Monday, 29 January 2018

Animation Project Talk with Andy Symanowski

Andy Symanowski came in to give us an introductory talk on stop-motion animation. He will be helping us throughout this project and I'm excited to learn from him!

What makes a good animation?
  • Showing emotion (through eyes / eyebrows)
  • Having control
  • Correct scale
  • Considering camera angles
  • Considering foreground, background, and midground
  • Importance of sound - Narration / Music / Lip syncing characters

Tips:
  • Design specifically for shots
  • Only build what you can see
  • Allow space for your characters
  • Keep good communication in the group
  • Video us doing actions to copy movements
  • Make a mockup (sizes in comparison to each other)
  • Don't rush the story - give space for development
  • Think about colour
  • Establish a style to shoot it in (genre)
  • Experiment (can give interesting outcomes)
  • Testing EVERYTHING is IMPORTANT
  • For lip syncing do recordings before animating (photograph mouth movements)
  • Research stop-motion films
I will refer back to this throughout the project to make sure we're on track and don't make any silly errors.

Tuesday, 23 January 2018

Contextual Studies

Today we found out we have a unit of work on contextual studies which will involve two essays and presentations based on films we will be sent to see in the following weeks.
I found it quite strange that we were only just finding out about this element of our course when it would have been helpful to know from the start. In fact I am kind of disappointed we hadn't carried on contextual lectures from the start of our course as I found them quite interesting and I think it would have been great to build up knowledge on the subject. Our contextual studies also doesn't seem to be very tailored to our course and the aspects of film that would be useful and important to learn as background knowledge for our practice.
Despite this I am looking forward to analysing films in more detail as this is something I touched on and loved when doing Media Studies at GCSE level. It also reminded me that I should be regularly watching new screen content to broaden my knowledge of film in general and inspire me in my work. I'm going to set a target to start watching a few films a week (I hope I stick to it)!

Tuesday, 16 January 2018

The Lion King : Theatre

UAL had arranged another theatre trip and this time it was The Lion King. I had heard so many amazing things about this production that I couldn't turn down the opportunity. I wasn't disappointed either!
The sets and costumes were all stunning! I was amazed at how they'd thought to represent some of the scenes from the film such as the stampede!

Notes to take from this experience:

  • Simple techniques can work very well (simple paper/fabric effects)
  • Colour scheme ties a production together

Saturday, 13 January 2018

Research for sign

I decided my sign would be a shop sign for an opticians. Mostly because I'd recently finished A Series of Unfortunate Events on Netflix and was obsessed although the original is still in my opinion the better version. 


After designing a steampunk looking version of this I thought it didn't give me many different materials and techniques to learn. I thought maybe I could make my sign change depending on whether the shop was open or closed. This is when the idea of an aperture eye came to mind! The idea excited me and I instantly started googling how-tos to see if it would be viable. From what I saw it didn't seem too complex and with all the workshops at uni I believe I can make it work!

Websites I used to help me with the aperture: